Followers
Thursday, November 24, 2011
Monday, November 14, 2011
This Red Cup of Mine
Friday, November 11, 2011
11-11-11 Happy Veteran's Day
With this day upon us, first THANK YOU! to all past, present and any furture soldiers out there along with their families. My grandfather was a WWII Vet - miss you Pampo, especially on this day.
I wanted to share with you something which happend yesterday while driving to pick up our daughter from school. As we were driving I happend to look to my left and with totally awe and amazement we saw, not 75 yards from the road a Bald Eagle - probably eating a fish since it was by a pond - just there! I have seen Eagles in captivity before, but never, EVER in the wild! It was the most beautiful thing ever! Even as I write this I am still in total shock that we saw one so close, in its natural elements! But to boot, I didn't have my camera and we were on a highway with other cars behind us (with some pulled over to look) so we could not pull over to just "stare"! I count my blessings and mark this off my list - I saw a Bald Eagle in the wild!
Thank you for coming to my blog today and visiting!
Wednesday, October 12, 2011
Beginning of Christmas cards
I am a member of a crafting group who get together once or twice a month and stamp cards of various themes. Within this group we have created numerous "mini" clubs involving various projects. One of these clubs is the card swap.
This months element was to use "mesh" of any kind. At first I was thinking, screen mesh, wire mesh but it dawned on me and many of the others mesh could be made of many various materials. I chose this cute kraft colored "mesh" ribbon I found at our local supercenter.
It is somewhat stiff so it takes a strong double sided sticky tape to adhere to your project, but I love the results. I stamped a snowflake on off white paper, edged with a green color and highlighted the points with a clear Stardust pen. If you have not tried these, they are a must for us crafters. They add just the right amount of "bling" to your project!
I made a pinwheel flower, added a gemstone to the center and a wood button to the center of the snowflake.
Here is a closer side view of the snowflake and the pinwheel flower. I used pop-up dots to give dimension to the snowflake!
Simple!
Thanks for stopping by and taking a peek at my blog and crafting projects!
Comments always welcome!
Blessings,
Saturday, October 8, 2011
Comfort food for Dinner
Since we woke up to this beautiful first snow of the season, I decided to make my family some comfort food for dinner. Hmmmm.......what shall I make?

After much thought and contemplation, I decided to make one of our favorites which I had not made in a while. RED CHILE ENCHILADAS!

My presentation to my family.
Keep warm everyone! Tomorrow 54 degrees in the Mile High City. Maybe we will be able to go to a Fall Festival after all!
Blessings,
N. A.
Monday, October 3, 2011
"O" Ring scalloped Homecoming album
Here is a "O" ring scalloped album I altered as a gift for our son's date he took to Homecoming. The papers comes from the dollar section of the scrapbooking section at Target and in using my Cricut Expression along with the Sophisticated cartridge! Enjoy! and Thanks for visiting!
Wednesday, September 21, 2011
Legend HS Homecoming project
Our son comes home on Tuesday and says, "Mom I need to paint a shirt to resemble Gil from Nemo." I said, "okay." "By when?" I ask. "Tomorrow!" "Mark, what the heck are you doing waiting until the last minute?" TEENAGERS!:)
Has this happened to anyone out there? Too many times to count for us...but we love him the same. Here is the finished project!
I then used brown, kraft wrapping paper and freehand drew a 3 foot sized picture of the coloring page Gil to the paper. I then drew the details on the paper using the pattern as my guide.
 I then drew the details on the paper using the pattern as my guide.
I used various craft paints to paint the outline of "Gil" on the shirt, then continued on in adding the detail.
This was somewhat simple for the first time trying. I think it turned out really cute and everyone loved it! Thanks for coming to by blog and taking a peek! Blessings!
Tuesday, September 6, 2011
Name Change....
So I have been asked by my friends as to why I chose Snipity Tweet Whispers as the name of my blog...but I really could not give a significant defined answer other than, "its what came to mine." So after much contemplation and deep soul searching I have decided to change the name of my blog to......drum roll please! Scrappin' -N-Crafting Princess. Hopefully this will fit my personality better! Blessings!
Monday, September 5, 2011
Lair o' the Bear Park
I hope everyone enjoyed Labor Day as much as I did. The family and I decided to go hiking up into a canyon called Lair o' the Bear Park. What a gorgeous place this is and to think it is in our back yard not more than 40 minutes from home.
Here is a stream that is running through the canyon which was running pretty fast. Our daughter couldn't keep her hands out of it. She said it was so cold. 
 Love it when she explores!

 Love it when she explores!
Here is another view of the canyon facing North.
Here is a canopy of vines growing on to a tree making the walk-through beautiful!
Someone is fortunate enough to have made a "castle" home in this canyon. It is extremely beautiful, with a water wheel, the stream flowing in front and the grounds are immaculate! And the trees...they are everywhere! Not to mention its in a forest!
We truly enjoyed our day hiking, geocashing and spending time as a family! We are truly blessed to live in such a beautiful state!
Until next time....
Blessings!
Wednesday, August 3, 2011
Paper Mache Cupcake alteration


 |


I found this paper mache cupcake at Joann's and decided it would be a great little project for our alteration group. I covered the base and top with geometical tissue paper and then painted the edge with white water base paint. I painted the top with some glue so that I could sprinkle sparkle glitter. This gave me the roughness I needed to have the "dripping icing" stick to the top. The icing is made with white paint with glossy mixed media to create the shiny. It is mixed together to the consistency of thinned icing. I used a popsicle stick to pour my icing on top and allowed it to "drip" over the edges. I sprinkled a little more glitter while the icing was wet. My little flowers are punched with a mini flower punch and made into mini rosed adhered to the sides with a glue dot. The top rose, made to resemble a cherry on top is made from grossgrain ribbon using the cross over technique and a piece of tan or natural hemp string for the stem.
Thank you for stopping by and visiting my blog. As always, comments welcome!
Thursday, July 21, 2011
Your my sunshine birthday card
Welcome to my blog...
and the Birthday Blog hop for http://creationsbygillm.blogspot.com/
I made this card with white card stock as the base of the card, then downloaded a designed paper with contains these pretty daisy flowers. The dotted trim paper is also downloaded from an online site which I punched mini daisy's to make a negative. I punched the same daisy from yellow cardstock and adhered it on top of the negative and curled the edges to make them pop. I curled a small strip of turquois paper with a quilling tool to make the centers. The stem of my large daisy is the same turquoise paper curled to almost a complete tube to make the stem for my flower. Used cork sheets and punched a large daisy flower using a Spellbinders diecut and filled in with flowersoft. Love this product. It is so versatile and fun to work with. If you have not tried it, please do...you will be love the results.
I hope you liked my designed birthday card. Comments are always welcome.
Blessings,
Tuesday, June 14, 2011
A RAK for a dear friend
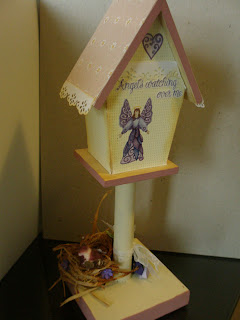
Here is a bird condo I made for a dear friend who was diagnosed with a brain tumor and then had surger and is now going through chemo and radiation. Forgive the back picture taking. I used various products on these as well as a Martha Stewart punch and Helmar glues. Made my own nest out of raffia and glue and used small pebbles for eggs in the nest. My husband made the base for me and added the dowel in making the house a "condo". He is so handy! Love it when he helps me with my creations!
Enjoy
A side view with the flower I made with various punches.
Tried to get a picture of the nest with the "eggs" inside.
A picture of the back. I used Creative Memories stickers with the saying "Angels watching over you" to let her know she can always rely on her special angel to lean on!
Thanks for stopping by and taking a look. Comments always welcome!
Sunday, May 29, 2011
 |
| A sample of a card I made for an organization who supports our troops by sending them cards to write home. Primarily used the Cricut Expression to cut all my pieces. |
 |
| Bearly Friends Bird House Condo |
 |
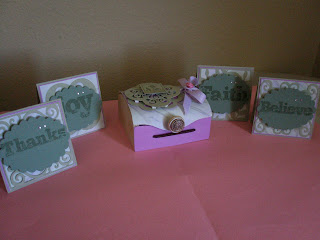
| Altered gift box using a balsa wood box from Michael's. |
 |
| Box with the mini cards that go inside. |
 |
| Another card I made for the troops using various papers and a pleasted flower. Hope you enjoy the udated projects. Comments welcome. Happy Memorial Day! Remember our troops! Past, Present and always! |
Wednesday, April 13, 2011
Spring is in the air...
Here is an altered tin I recently created using my cricut and some of my cartridges. I am loving all the birds outside chirping and singing. This brings happiness just seeing it!
Subscribe to:
Posts (Atom)


